
Dronelost.com – DJI FPV is a revolutionary drone that combines the thrill of first-person view (FPV) flying with the ease and safety of DJI’s technology. Whether you’re a beginner or an expert, DJI FPV can offer you an immersive and exhilarating flying experience like no other.
But before you can enjoy the full potential of DJI FPV, you need to master the basics of taking off and landing your drone. This is not only important for your drone’s safety, but also for your own confidence and skill as a pilot.
We’ll show you how to take off and land your DJI FPV drone like a pro, using the two different controllers that come with the drone: the remote controller and the motion controller. We’ll also share some tips and tricks, common mistakes to avoid, troubleshooting advice, and advanced techniques to improve your takeoff and landing performance.
By the end of this post, you’ll be able to take off and land your DJI FPV drone smoothly and safely, and be ready to explore the skies with your new drone. Let’s get started!
What You Need to Know Before Taking Off and Landing Your DJI FPV Drone

Before we dive into the step-by-step guide, there are some essential things you need to know before taking off and landing your DJI FPV drone. These include:
- The pre-flight checks you need to perform to ensure your drone is in good condition and ready to fly.
- The different modes and features of your drone that affect how it takes off and lands, such as GPS mode, Home Point, Return to Home (RTH), and automatic landing.
- The different ways you can control your drone, using either the remote controller or the motion controller, and how they differ in terms of functionality and operation.
- The best practices and safety tips for taking off and landing your drone in different environments and situations, such as indoors, outdoors, windy, or low-light conditions.
We’ll cover each of these topics in more detail in the following sections, so make sure you read them carefully before attempting to take off or land your DJI FPV drone.
How to Perform Pre-Flight Checks for Your DJI FPV Drone
Before you take off your DJI FPV drone, you need to perform some pre-flight checks to ensure that your drone is in good condition and that you comply with local laws and regulations. Here are the steps you need to follow:
- Check the battery level of your drone, remote controller, motion controller, and goggles, and make sure they are fully charged or have enough power for your planned flight duration.
- Check that the propellers are firmly attached to the drone and that there are no signs of damage, cracks, or wear. If there are, replace them with new ones.
- Check that the SD card is inserted correctly into the drone and that it has sufficient storage space for your video and photo files. If not, format the SD card or use a different one.
- Check the weather and wind conditions and make sure they are suitable for flying. Avoid flying in rain, snow, fog, or strong winds, as they can affect your drone’s performance and safety.
- Check the local laws and regulations regarding drone flying and make sure you follow them. For example, you may need to register your drone, obtain a license or permit, or fly within certain areas or altitudes. You can use the DJI Fly app to check the geo-fencing zones and flight restrictions in your area.
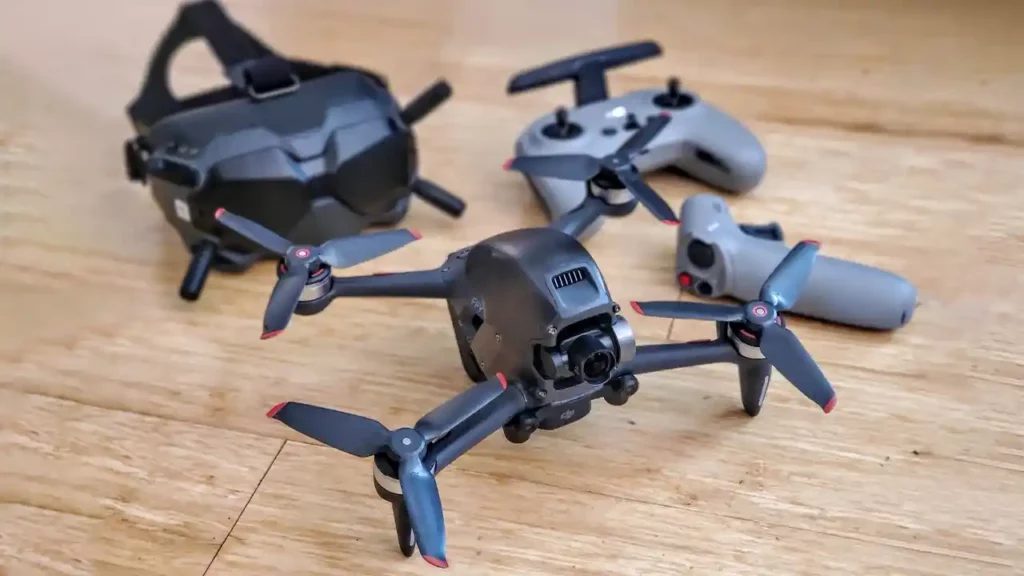
DJI FPV Take Off and Land
The DJI FPV drone is a hybrid of a racing drone and a camera drone, which means it can fly fast and agile, as well as capture stunning aerial footage. It also comes with two different controllers: a traditional remote controller and a motion controller. Depending on which one you use, the way you take off and land your drone will be different. Let’s look at each option in more detail.
1. How to Take Off Your DJI FPV Drone Using the Remote Controller
The remote controller is the default way to control your DJI FPV drone. It has two joysticks, a flight mode switch, a return to home (RTH) button, a pause button, a shutter button, a record button, and a gimbal dial. You can use the remote controller to fly your drone in three different modes: Normal (N), Sport (S), and Manual (M). To take off your DJI FPV drone using the remote controller, follow these steps:
- Turn on your drone, remote controller, and goggles, and wait for them to connect. You should see a live video feed from your drone’s camera on your goggles.
- Put on your goggles and adjust the straps and lenses until you have a clear and comfortable view. Make sure you have a spotter with you who can watch your drone and the surroundings while you fly.
- Use the DJI Fly app on your smartphone to check the status of your drone, such as the battery level, GPS signal, flight mode, and flight restrictions. You can also use the app to adjust the camera settings, calibrate the compass, and update the firmware.
- Place your drone on a flat and open surface, away from any obstacles or people. Make sure the drone is facing away from you, and that the propellers are not blocked by anything.
- Slide the flight mode switch on the remote controller to the Normal (N) mode. This is the easiest and safest mode to fly your drone, as it has GPS positioning, obstacle sensing, and altitude hold features.
- Press and hold the RTH button on the remote controller for two seconds, until you hear a beep. This will set the Home Point, which is the location where your drone will return to if you lose the signal or press the RTH button again.
- Push both joysticks to the bottom inner corners, and then release them. This will start the motors and make the drone hover at about 1.2 meters above the ground. You can also press the takeoff button on the app to do the same thing.
- To ascend, push the left joystick up. To descend, pull the left joystick down. To rotate left or right, push the left joystick left or right. To move forward, backward, left, or right, push the right joystick in the corresponding direction. To tilt the camera up or down, rotate the gimbal dial on the remote controller.
2. How to Land Your DJI FPV Drone Using the Remote Controller
The remote controller is the default way to control your DJI FPV drone. It has two joysticks, a flight mode switch, a return to home (RTH) button, a pause button, a shutter button, a record button, and a gimbal dial. You can use the remote controller to fly your drone in three different modes: Normal (N), Sport (S), and Manual (M). To land your DJI FPV drone using the remote controller, follow these steps:
- When you are ready to land, make sure you have enough battery power left for your drone to land safely. You can check the battery level on your goggles or on the app. If the battery level is low, you will hear a warning beep and see a low battery alert on your goggles. You should land your drone as soon as possible to avoid losing power or damaging your drone.
- Find a suitable landing spot and fly your drone towards it. Make sure the landing spot is flat and open, and that there are no obstacles or people below your drone. You can use the obstacle avoidance feature on your goggles to see the distance and direction of the obstacles in front of your drone.
- Align your drone with the Home Point and make sure it is facing the same direction as when it took off. You can use the return to home (RTH) feature to make your drone fly back to the Home Point automatically. You can also use the precision landing feature to make your drone land on the exact spot where it took off.
- Slide the flight mode switch on the remote controller to the Normal (N) mode. This is the easiest and safest mode to land your drone, as it has GPS positioning, obstacle sensing, and altitude hold features.
- Slowly lower your drone until it touches the ground, by pulling the left joystick down. You can also press the landing button on the app to do the same thing. Make sure you keep your drone stable and level, and avoid sudden or jerky movements.
- Push both joysticks to the bottom inner corners, and hold them until the motors stop. This will stop the propellers and turn off the drone. You can also press the pause button on the remote controller to do the same thing.
- Turn off your remote controller, goggles, and drone, and remove the battery from the drone. Make sure you store your drone and its accessories in a safe and dry place. You can also use the app to review your flight data and footage, and share them with others.
3. How to Take Off Your DJI FPV Drone Using the Motion Controller
The motion controller is an optional accessory that you can use to control your DJI FPV drone with one hand. It has a trigger, a brake button, a RTH button, a flight mode switch, a record button, and a control stick. You can use the motion controller to fly your drone in two different modes: Normal (N) and Sport (S). To take off your DJI FPV drone using the motion controller, follow these steps:
- Turn on your drone, motion controller, and goggles, and wait for them to connect. You should see a live video feed from your drone’s camera on your goggles.
- Put on your goggles and adjust the straps and lenses until you have a clear and comfortable view. Make sure you have a spotter with you who can watch your drone and the surroundings while you fly.
- Use the DJI Fly app on your smartphone to check the status of your drone, such as the battery level, GPS signal, flight mode, and flight restrictions. You can also use the app to adjust the camera settings, calibrate the compass, and update the firmware.
- Place your drone on a flat and open surface, away from any obstacles or people. Make sure the drone is facing away from you, and that the propellers are not blocked by anything.
- Slide the flight mode switch on the motion controller to the Normal (N) mode. This is the easiest and safest mode to fly your drone, as it has GPS positioning, obstacle sensing, and altitude hold features.
- Press and hold the RTH button on the motion controller for two seconds, until you hear a beep. This will set the Home Point, which is the location where your drone will return to if you lose the signal or press the RTH button again.
- Pull the trigger on the motion controller and release it. This will start the motors and make the drone hover at about 1.2 meters above the ground. You can also press the takeoff button on the app to do the same thing.
- To ascend, pull the trigger again and hold it. To descend, press the brake button and hold it. To rotate left or right, tilt the motion controller left or right. To move forward, backward, left, or right, tilt the control stick in the corresponding direction. To tilt the camera up or down, rotate the control stick clockwise or counterclockwise.
4. How to Land Your DJI FPV Drone Using the Motion Controller
The motion controller is an optional accessory that you can use to control your DJI FPV drone with one hand. It has a trigger, a brake button, a return to home (RTH) button, a flight mode switch, a record button, and a control stick. You can use the motion controller to fly your drone in two different modes: Normal (N) and Sport (S). To land your DJI FPV drone using the motion controller, follow these steps:
- When you are ready to land, make sure you have enough battery power left for your drone to land safely. You can check the battery level on your goggles or on the app. If the battery level is low, you will hear a warning beep and see a low battery alert on your goggles. You should land your drone as soon as possible to avoid losing power or damaging your drone.
- Find a suitable landing spot and fly your drone towards it. Make sure the landing spot is flat and open, and that there are no obstacles or people below your drone. You can use the obstacle avoidance feature on your goggles to see the distance and direction of the obstacles in front of your drone.
- Align your drone with the Home Point and make sure it is facing the same direction as when it took off. You can use the return to home (RTH) feature to make your drone fly back to the Home Point automatically. You can also use the precision landing feature to make your drone land on the exact spot where it took off.
- Slide the flight mode switch on the motion controller to the Normal (N) mode. This is the easiest and safest mode to land your drone, as it has GPS positioning, obstacle sensing, and altitude hold features.
- Slowly lower your drone until it touches the ground, by pressing the brake button and holding it. You can also press the landing button on the app to do the same thing. Make sure you keep your drone stable and level, and avoid sudden or jerky movements.
- Press the pause button on the motion controller and hold it until the motors stop. This will stop the propellers and turn off the drone. You can also press the pause button on the remote controller to do the same thing.
- Turn off your motion controller, goggles, and drone, and remove the battery from the drone. Make sure you store your drone and its accessories in a safe and dry place. You can also use the app to review your flight data and footage, and share them with others.
Troubleshooting for Taking Off and Landing
Sometimes, you may encounter some problems or errors when taking off or landing your DJI FPV drone. These can be caused by various factors, such as the drone’s condition, the environment, the controller, or the user. Here are some troubleshooting tips that can help you solve some common issues and prevent them from happening again:
- If your drone does not start the motors or take off, check the following:
- Make sure the battery is properly inserted and locked, and that it has enough power.
- Make sure the propellers are correctly installed and not damaged or loose.
- Make sure the drone is on a flat and level surface, and that there are no obstacles or people around it.
- Make sure the drone is in the Normal (N) mode, and that the flight mode switch is not in the middle position.
- Make sure the remote controller or the motion controller is connected to the drone, and that the signal strength is good.
- Make sure the GPS signal is strong and that the Home Point is set.
- Make sure the compass is calibrated and that there is no magnetic interference.
- Make sure the firmware is up to date and that there are no error messages on the app or the goggles.
- If your drone does not land or stop the motors, check the following:
- Make sure the battery is not too low or depleted, and that the low battery warning is not triggered.
- Make sure the landing spot is flat and open, and that there are no obstacles or people below the drone.
- Make sure the drone is in the Normal (N) mode, and that the flight mode switch is not in the middle position.
- Make sure the remote controller or the motion controller is connected to the drone, and that the signal strength is good.
- Make sure the GPS signal is strong and that the Home Point is set.
- Make sure the downward vision system is working and that the landing pad is visible.
- Make sure the firmware is up to date and that there are no error messages on the app or the goggles.
- If your drone does not return to the Home Point or land automatically, check the following:
- Make sure the RTH button is pressed and held for two seconds, and that you hear a beep and see a confirmation on the goggles.
- Make sure the drone has enough battery power to fly back and land safely, and that the critical battery warning is not triggered.
- Make sure the drone is not too far away from the Home Point, and that the maximum flight distance is not exceeded.
- Make sure the drone is not in the Manual (M) mode, and that the flight mode switch is not in the middle position.
- Make sure the remote controller or the motion controller is connected to the drone, and that the signal strength is good.
- Make sure the GPS signal is strong and that the Home Point is set.
- Make sure the compass is calibrated and that there is no magnetic interference.
- Make sure the firmware is up to date and that there are no error messages on the app or the goggles.
Advanced Techniques
If you want to take your DJI FPV drone flying skills to the next level, you can try some advanced techniques for taking off and landing your drone. These techniques can help you improve your control and precision, as well as add some flair and fun to your flying experience. Here are some of them:
- Hand launch and catch: This technique allows you to take off and land your drone from your hand, without using a landing pad or a flat surface. This can be useful when you are flying in a crowded or uneven area, or when you want to save some time and battery power. To do this, you need to hold your drone firmly by the battery compartment, with the propellers facing away from you. Then, you need to start the motors and throw your drone into the air, while controlling it with the remote controller or the motion controller. To land, you need to fly your drone close to your hand, and grab it by the battery compartment, while stopping the motors. Be careful not to touch the propellers, as they can cause injury or damage.
- Flips and rolls: This technique allows you to perform some acrobatic maneuvers with your drone, such as flips and rolls. This can be fun and exciting, as well as challenging and rewarding. To do this, you need to switch your drone to the Manual (M) mode, which gives you full control over the drone’s movement and speed, but also requires more skill and attention. Then, you need to use the right joystick on the remote controller or the control stick on the motion controller to tilt your drone in the direction you want to flip or roll. You can also use the left joystick or the motion controller to adjust the throttle and the yaw. Be careful not to lose control or orientation of your drone, as it can crash or fly away.
- FPV landing: This technique allows you to land your drone using only the first-person view (FPV) from your goggles, without looking at your drone or the surroundings. This can be useful when you are flying in low-light or poor visibility conditions, or when you want to test your FPV skills and accuracy. To do this, you need to fly your drone to the landing spot, and use the camera tilt and the gimbal dial to adjust the angle of the camera. Then, you need to lower your drone slowly and gently, while using the obstacle avoidance and the downward vision system to avoid any collisions or errors. You can also use the RTH or the precision landing feature to assist you. Be careful not to land on an uneven or unstable surface, as it can damage your drone or cause it to tip over.
DJI FPV is a drone that offers a unique and thrilling flying experience, but it also requires some skills and knowledge to take off and land safely and smoothly. We hope that has been helpful and that you have learned something new and useful.